You see, for years I’ve been able to talk my husband into candy runs to Walgreens anytime the urge for a butterfinger or a bag of M&M’s hit.
2 kids later though, and all of a sudden, he’s not as willing to hop into the car and satisfy my cravings. It *might* have something to do with the fact that he is out the door by 6 AM each morning and doesn’t get a moments peace until after we put the kids to bed after 7pm.
I get it, I mean I really get it. However, when a chocolate craving hits, I’m not exactly rational about it. In fact, that is the one instance (well in my humble opinion) where I truly can turn into a brat.
I posted a few weeks ago about finally receiving my highly anticipated Ice Cream maker. I purchased my ice cream maker with Swagbucks and it was something that I saved up for awhile! I kept prioritizing other purchases over it, and I got more and more impatient! Finally I decided that I wanted homemade ice cream at Lizzie’s birthday party, so of course I had to buy the ice cream maker! Luckily the exact model I wanted (The Cuisineart ICE-21) dropped from $90 to $37 and that was all the incentive I needed!
I am so happy to say that we love this ice cream maker. I honestly thought that homemade ice cream was something I was going to have to develop a taste for. That my taste buds would have to acclimate to truly enjoy it. Oh boy, I was so wrong. Homemade ice cream is a little bit of heaven on earth. Who knew such simple ingredients could result in such perfection? I am sharing the two recipes we have tried so far. Please let me know about any other awesome ice cream (or frozen yogurt, I really need to make some lightened up versions!) recipes you might have in the comments!
Tot Tuesdayis a weekly feature where I highlight a special kids activity, frugal recipe for kids, kids tutorial, etc.
This will be the last Tot Tuesday post of 2010, so I thought we should go out with a sugar induced coma. The other day, I was browsing through Momtastic and found this adorable recipe for a Mini Candyland House. I am not a fan of gingerbread, so the fact that this used Graham Crackers was a huge plus to me!
I’ll admit, I generally buy the kits at the store to make our yearly Gingerbread Houses.
Unfortunately, those kits are way too expensive and to be honest, the candy really stinks. I wanted good candy and I wanted to use stuff I already had on hand! We did make a small candy run to Walgreens, but spent less than $4.
I portioned out our candy into a handy little plastic serving dish I have:
The icing was a breeze to make, but I didn’t realize just how rough my kiddos would be on their houses. Honestly, I should have made the houses and let them dry before handing them over to my over eager toddlers (I can still call my son a toddler right? He’s not 4 until March!).
It started off really well, but very quickly this (above) turned into this (below):
After assuring him it was okay and we would still decorate our Candyland Piles, he got back to work.
Lizzie was a bit bothered by how sunny it was outside, but she had a lot of fun building her Candyland Pile as well.
The finished product wasn’t quite what we expected, but we had so much fun! I highly encourage you to make some Candyland Houses (or Piles!) with your little ones while you await Christmas! For maximum success, build your houses before you hand them over to your excited children. It’s not necessary though. Even with a less than stellar after product, we had:
This morning I decided I was going to take advantage of the “extra” hour given by DST and wake up earlier than my kiddos. I only ended up getting 40 minutes (try telling my kids we get an extra hour of sleep..they aren’t buying it!), but they were the most productive 40 minutes I’ve had in a LONG time.
In 40 minutes, I:
1. Read my Bible Verses 2. Did a quick 10 minute exercise DVD from Netflix 3. Took a shower!
The only thing that would have made the morning more productive is if breakfast had been ready by the time the kids woke up. Noah requested Silly Silly Muffins, and unfortunatley I have no recipe for that (what kind of mommy am I!). I was able to convince him that Applesauce Muffins were really quite silly…so we pulled out the ingredients and got to work! Here’s our recipe:
Silly Silly Applesauce Muffins (we use cupcake liners and it makes about 12)
1 1/2 cups flour (we do half wheat half white)
1 tspn baking powder
1/2 tspn baking soda
1/2 tspn salt
1 tspn cinnamon
2/3 cup brown sugar
2 1/2 tbspn butter
2 cups apple sauce
2 small apples diced
2 eggs
Preheat oven to 350 degrees
Mix dry ingredients together
Add wet ingredients and apples and mix until batter is just moistened
Line cupcake pan with liners and spoon in batter
Bake for 20-22 minutes
Let cool and enjoy!
I thought this recipe would be a great addition to the frugal recipes here on Family Friendly Frugality!
Want to learn a bit more about Family Friendly Frugality? Learn more about our family blog by reading our about me post. Or jump in head first and learn how to save money grocery shopping, play the drugstore game, or catch up on the hottest deals!
This is THE best chocolate chip cookie recipe on the internet! Guaranteed to make your house the “cool” house. Try the best chocolate chip cookie recipe and let me know what you think!
Today we’re going to talk about cookies. Not just any cookies, but CHOCOLATE CHIP COOKIES (yes that word is bolded, italicized AND underlined…if I could add sparkles to it I would have).
Before I had kids, I was on a mission to find the BEST Chocolate Chip Cookie recipe ever.
I had visions of my children declining invitations to friends houses, instead saying “No, come over MY house. My mom makes the best chocolate chip cookies ever“.
Of course, I’d have my hair curled and be wearing a pretty dress with heals and a frilly apron. More than happy to bake cookies for all the neighborhood kids.
Well so far, that hasn’t happened. Give it time though, my kids are only 3 and 1. However, I do believe I’ve found the perfect chocolate chip cookie recipe.
It’s not just about the ingredients! Oh no. It’s also about the techniques!
Melt the butter in the microwave (be sure to use REAL unsalted butter)
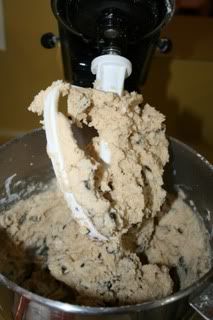
Cream together the butter, white sugar, and brown sugar until smooth.
Beat in the eggs one at a time, then stir in the vanilla.
Dissolve baking soda in hot water.
Add to batter along with salt. Stir in flour and chocolate chips
Place batter into refrigerator for at LEAST 1 hour, preheat oven to 350
Take out the dough and drop by rounded tablespoon fulls onto an UNGREASED cookie sheet
Let bake for 15-17 minutes, checking often until the edges are browning and the middle is just barely set. Don’t overcook! They cook a little more once you take them out of the oven.
As my son would say DELICIOUS!
I guarantee your house will be the hot spot if you bake these cookies! It makes a pretty large batch so you can even freeze some of the dough in portions.
Sometimes, if I’m feeling really ambitious, I’ll go ahead and freeze the dough in balls on a cookie sheet. Than I place the balls in freezer bags so I can just pull out however many cookies we want at that time.
Made to order homemade cookies! Doesn’t get much better than that!
Melt the butter in the microwave (be sure to use REAL unsalted butter)
Cream together the butter, white sugar, and brown sugar until smooth.
Beat in the eggs one at a time, then stir in the vanilla.
Dissolve baking soda in hot water.
Add to batter along with salt. Stir in flour and chocolate chips
Place batter into refrigerator for at LEAST 1 hour, preheat oven to 350
Take out the dough and drop by rounded tablespoon fulls onto an UNGREASED cookie sheet
Let bake for 15-17 minutes, checking often until the edges are browning and the middle is just barely set. Don’t overcook! They cook a little more once you take them out of the oven.
Looking for a frugal way to provide some entertainment for your kids? Get them into the kitchen! Kids LOVE to help in the kitchen. It will probably be messy and it will probably require patience, so be sure to do it on a day where you aren’t pressed for time or the house needs to be clean for company. Explore the benefits of cooking with your kids!
Today my 3 year old told me he wanted cupcakes. I told him I wanted some too, could he go make me some? I was joking, but minutes later I found him in the kitchen with these supplies:
Not exactly cupcake making material. Muffins maybe? But upon further investigation I discovered we had no cupcake or muffin liners. I asked if brownies would suffice, and after some hesitation he decided it would.
So we got to work.
When cooking with your kids. Simple is best. Don’t try and make a complicated layer cake with a three year old. One bowl recipes with easy to pour and measure ingredients are probably your best bet.
My favorite recipe to make with my son is Bakers One Bowl Brownies . It really is just one bowl and the simplest of ingredients.
1 cup coarsely chopped PLANTERS Pecans (we omitted this, just not nut fans here)
Directions
1. Preheat oven to 350 degrees F. Line 13×9-inch baking pan with foil, with ends of foil extending over sides of pan. Grease foil. 2. Microwave chocolate and butter in large microwaveable bowl on HIGH 2 min. or until butter is melted. Stir until chocolate is completely melted. Stir in sugar. Blend in eggs and vanilla. Add flour and pecans; mix well. Spread into prepared pan. 3. Bake 30 to 35 min. or until wooden toothpick inserted in center comes out with fudgy crumbs. (Do not overbake.) Cool in pan on wire rack. Remove brownies from pan, using foil handles. Cut into squares. Store in tightly covered container at room temperature.
Noah really enjoyed himself a lot (as you can tell). The entire pan of brownies couldn’t have cost more than a few dollars. There are many benefits to cooking with your kids, specifically patience because brownies take a long time to bake!